
We use Corona almost exclusively at The Boundary, but after so many years of using vray I still follow development closely and use it for things that corona cant do. In converting an old project, 152 Elizabeth Street to corona, I thought it would be a good time to write a blog post on the differences between the two rendering engines and also to see how much Vray has improved since I used it to render this project in 2014/15.
Final Original Image rendered at 6k (Including photoshop work) (click for lightbox)
The first thing I did was render in Vray using my original settings but at 2k resolution so we can see what an unprocessed Vray version looks like. This took 1hr 15 minutes at a bucket noise threshold of 0.007. (amazing seeing buckets again!)
Vray render using my old settings - 1hr 15mins
Next I tried Vray 3.5 at default settings, which seems to be what Vlado suggests to most people. I switched to brute force settings in Vray years ago and its great to see that with developments in software and hardware this is now the norm. This time it took 58 minutes.
Vray render using default settings (progressive) - 58mins
Here is a 100% crop between the two versions. My previous settings were 1-100 subdivs and a noise threshold of 0.007, probably had subdivs on materials too (seems so weird to have to think about things like that after using corona for 2 years). I can't see any real difference here so not sure why anyone in arch viz would deviate from the defaults in vray these days.
bucket brute force vs progressive
Converting a Vray scene to Corona is pretty much a one-click process thanks to the amazing conversion script that comes with corona (I should add that the conversion back to Vray using the script that comes with Vray is also very good should you need to go that way.) Some things to remember though:
- Vray cameras work fine in Corona, but you might need a coronacameramod to fine tune DOF
- The vrayhdri map works well in Corona but remember the render multiplier doesn't do anything so adjust your overall multiplier accordingly
- There is no need for a dome light (plug vrayhdri straight into environment) so remember to take into account any multiplier on the domelight
- I use vrayhdri and vraycameras, there still aren't equivalents in Corona
- Corona's displacement is inferior to Vray's. You will need to play with the corona settings to try to match it, especially if you used vray 2d displacement. (Corona 3d displacement has improved a lot but I still miss Vray 2d displacement.)
- In Corona, you just apply coronafogmtl straight to geometry, no need for a gizmo.
- Matching vray2sidedmtl with Corona is always a bit hit and miss, I use interactive and tweak till it looks similar
For a comparison between vray and corona, I wanted to see what a 20 minute render would look like in each. Vray after 20mins:
VRAY - 20 minutes render
On to Corona (Latest 1.6 daily) and after matching the exposure, vignetting, colour balance, curves (there are now curves in Corona!!!) this was what I got. Corona after 20 mins
CORONA - 20 minutes render
After 20 minutes, corona did seem to deal with noise better, especially in the concrete and ceiling areas. The displaced carpet looks way better in vray, despite increasing the quality of displacement in corona from 2px to 1px. Overall I'd say they are pretty similar in terms of quality.
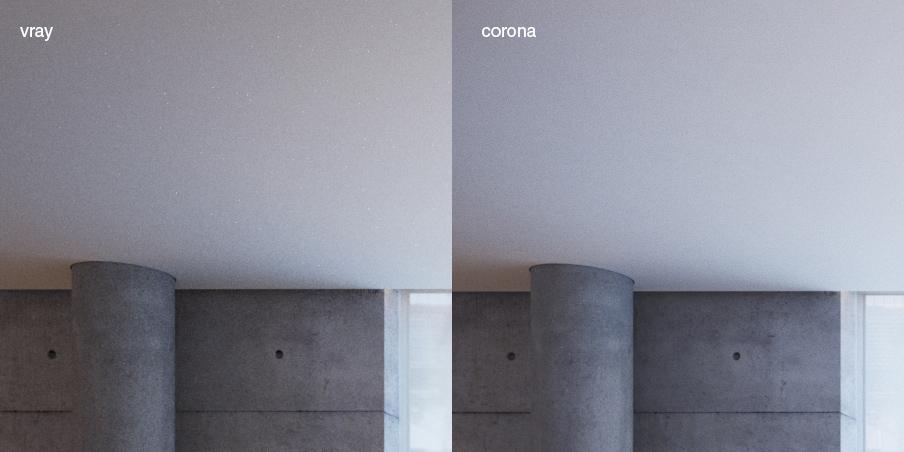
Note the overbright pixels on the vray version
Pushing Corona Further
The joy of working with Corona is in using Interactive rendering to explore new compositions, tweak materials, play with lighting etc. If you haven't tried it you really should. I never got on very well with VrayRT, partly because it required more set-up and because it wasn't the same as a final render. Another thing Corona does very well is lens effects (bloom and glare). For some reason its much easier to get nice results with Corona and you can also tweak them as it is rendering. I'm going to finish with a slightly re-worked version of this scene, made entirely in Corona with no post work at all.
A quick Note on vignetting in Corona: Vignetting in 1.6 finally works as (I believe) it should, in that it doesnt just add what looks like a black overlay, it correctly reduces the exposure at the corners. This now means that really bright areas (sky) will not look artificially dark when you add vignetting. I have never used vignetting in corona for this reason, but now I'll probably use it much more often, as I did with vray.
Final Corona Version
Final Corona Frame Buffer Setting (using Corona 1.6 daily):
Exposure:
Highlight Compression: 5
WB: 4600K
Contrast: 1.0
Saturation: 0.0
Filmic highlights: 0.0 (my advice would be don't use filmic, it often acts strangely)
Filmic shadows: 0.0
Vignette: 1.0
Curves: NO

LUT: Kim Amland's Photographic 01 LUT that mimic real dslrs.

Bloom and Glare:

Bloom intensity: 5.0
Glare Intensity: 1.50
Streak blur: 0.20

Sharpening / Blurring:

Sharpen amount: 1.0
Sharpen radius: 0.250
Blur radius: 1.250
Many thanks to Kim for his work in analysing what dSLRs do to the raw data they capture in order to make them look good. It's very interesting that the quick Corona FB tonemapping I did in this last image resulted in something similar to what took a lot longer in photoshop & Adobe Camera RAW.
I love being able to get amazing looking images straight out of 3dsmax with no post work at all. Next on my wishlist would be colour temperature tint (from green to magenta)... please Ondra & Vlado??
You can read more about the LUTs and download them from his thread on the forum