
Many thanks to tomGlimps for this tutorial on using HDRi Skies in Octane Render. I'm going to have to try Octane now!
As title says, here we are going talk about how to use HDRi skies in Octane Render. The tutorial is going to cover simple introduction with few tips. I’m going to use Standalone version, however the same principles could be applied to any of Octane Render plugin (3ds Max, Maya, Blender, Archicad, Lightwave, Modo, Sketchup, Cinema4D, Nuke.. & the rest, nearly 30 plugins in total) - no matter which host application you’re in, core functionality of Octane Render is the same & the only thing that differs is going to be the interface.
For those who don’t know, Octane Render is an unbiased GPU powered rendering engine. much like Vray RT for GPU, ARION Render, Iray, etc. Unlike any of mentioned software Octane Render isn’t hybrid engine (running on CPU & GPUs), nor does it run on CPUs at all, at least for now, as recently in GTC 2015 unveiled version 3 will run on more devices & have more impressive feature list. Save to say, it’s one of the most advanced GPU engines powered by CUDA capable devices. For more information you can visit OTOY’s website or their forums.
So, without further ado, let’s dive in! We are going to use v2.21 (thought the same could be done with demo version, if You wish to try without buying a license, just keep in mind: render resolution of it is limited to 1000x600, also missing possibility to save file, output has watermarks, no LiveDB & network rendering support).
I hope you have at least very basic understanding of how Octane Render (or similar programs) work, if not, you can always consult online manuals. I’ll cover things you have to keep an eye on, but the rest will more or less be out-of-the-box - that’s the beauty of unbiased engines, you don’t need to think about complicated settings or some mysterious dials. Simply open a program, choose a rendering algorithm, input geometry & it renders. You can do some lighting, material tweaking in a meantime & once you happy with composition the longer you leave, “the better end result is going to be” (we’ll get back to this topic later).
Loading HDRi sky map
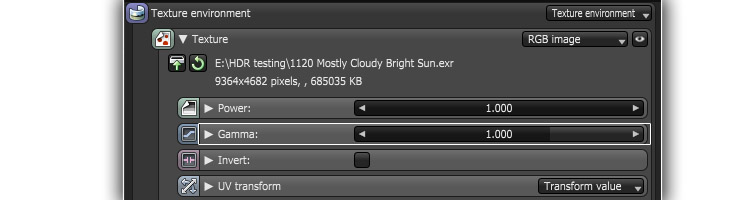
To load HDRi sky: choose textured environment from drop down menu & pick RGB image option.
If you want to rotate the map, look under UV Transform - T.X. parameter will allow you to rotate your map around vertical axis.
Linear Workflow (LWF) inside Octane Render
Again this is more or less out-of-the-box. Thing to remember about HDRi is that once you import them, they should have gamma set to 1.0 value.
In Imager settings don’t forget to choose Linear/Off in Response
The rest of your scene textures for natural looking result should have gamma of 2.2. Believe it or not, that’s all you have to deal with if you wish to work with LWF in mind.
Note/tip: If you’d like to color correct your shot inside Octane Render, you can choose from bunch of different responses to start with (it’s a fastest way to experiment with the mood in your scene, without touching lighting itself).
After that you tweak gamma, vignetting, white balance also add post processing (controlling bloom, glare, etc.)
In this way you might end up having no need to touch rendered-out result post at all (maybe just for adding watermarks) - though overall this might take a bit more time to get the right balance.
Importance Sampling
Another small, yet important checkbox that could speed up your renders sits at the end of HDR environment settings
(should be enabled by default, but If you tick that off while playing around make sure to check it). Here’s what manual says about this feature:
Enables quicker convergence (noise reduction) for HDRi images by applying importance to certain areas of the HDRI so as to sample rays that resolve to the important areas more often than unimportant areas. This means the ray tracing is more efficient as it is not wasting time on rays that do not contribute much to the overall image quality. Due to the added complexity this will reduce the Ms/sec of rendering, but each Ms will be more effective, therefore resulting in a higher image quality in less time. Importance sampling is enabled by default.
(source: Environments Maps/HDRi environments - Octane Render Manual)
Enough of theory
I’ve prepared a free scene, if You would like to play around yourself. Included few render targets useful for preview HDRi inside Octane Render.
First two from the left are created for preview purpose to see full sky map, inspecting how it looks (helpful for tweaking exposure, color balance, etc.).
“Fish eye lens” holds a camera pointed straight up with 180 degree field-of-view & camera distortion set to 1. This gives a perfect shot of sky dome (that’s the way multiple exposures are captured in real world using Full-frame camera with FishEye lense attached)
The second target has Panoramic camera. Again you can see entire sky texture with less distortions.
But “what the difference?” you may ask & that’s a good question. Well, FishEye lens approach would distort texture You try to preview close to horizon, while Panoramic brings more distortions to very top, so you can choose any of those depending on the sky map You’re using.
Both of these methods allow to see full sky in a single frame, without any need to rotate camera & look around. It’s very useful for initial preview/overview while you going from sky to sky. Something like 50mm lens on 36mm sensor would give you only 40degree FOV - while using any of mentioned previews you would get full 360.
Third render target is simple geometry (I’ve taken from free Lounge Chair Scene) with grey lightly specular material. By having no textures you get a clear shot for good understanding of how light from your chosen HDRi sky works (as you might already noticed environment node is shared among all render targets, so you could go through all of them without any need to reload each time).
Last but not least, you get a render target with camera (equivalent of 50mm on full-frame sensor). Simply add your own geometry, put some textures & you got a shot!
Note/tip: if You need sharper shadows, You can tweak HDRi gamma setting (make it slightly higher), just keep in mind this will change not only light, but also influence reflections too.
So, we are leaving you with this downloadable scene (alternative link) in single .orbx package to try it on your own. Thanks to Peter who kindly provided not one, but two of his maps. (For scene to be lighter & faster to download we made resolution smaller, but it works & looks perfect).
& here’s a fun part!
Now as you have fully setuped scene & HDRi map(s) coming with it, here is what you can do:
Drop some geometry inside & make some nice pictures (using Octane Render standalone or any of plugins).
Post on OTOY’s forums here for a possibility to be featured & get back any map you’d like to have as prize if you get lucky!
You could also use the same scene not only with sky maps (dome), but full (spherical) HDRi maps too (Panoramic preview, 2nd target, works better in that case)
If you want to put the object into environment, you need an extra geometry (let’s say simple plane) under your object with diffuse material & matte function (in material options) enabled. This will give you ground shadow so your object won't be floating.

Here’s the example scene I’ve recently made for testing materials using full HDRi map from CG-Source. Pine board textures (on the side of wooden slabs) are also from the same site as HDRi map, but all the rest, plywood sheet textures are from Peter Guthrie (his old 3D Ocean store).
Tip: Apart from moving camera, using lens shift, lightly moving geometry (using translate node) is going to help you find perfect place for your object on chosen HDRi.
Final words, regarding to HDRi usage inside Octane Render
As mentioned before, I’m getting back to that ..“the better end result is going to be”. Unbiased render engines provide headache-free rendering possibilities (much like Peter’s chosen way to Brute Force, though this route might be quite compute intensive & on CPU slower than other, biased methods).
Keeping mind that any program itself isn’t going to be a “magic wand”: you still need to know how light works in order to set up a scene, “a bit” about camera, shading & materials, but with saved time & increased interactivity using GPU engines like Octane Render you can spend more time testing ideas, searching for that tasty shot, rather than tweaking something under the hood..
HDRi skies in combination with unbiased engines is one of the fastest ways to get the most realistic result with as little effort as possible.
Hope this has been useful for some, feel free to download share files & play with them. If you would like to read more about Octane Related related stuff, GPU rendering from software to hardware - feel free to visit tomGlimps.