Good to see the Elizabeth Street project getting a lot of publicity, comments generally seem to be positive too.
Phaidon - Daily Tonic - Dezeen - Arch Daily - Curbed NYC - Archinect

Good to see the Elizabeth Street project getting a lot of publicity, comments generally seem to be positive too.
Phaidon - Daily Tonic - Dezeen - Arch Daily - Curbed NYC - Archinect
A little taster of many more images to come. I'm very excited to be working with Tadao Ando Architect & Associates and Gabellini Sheppard Associates on this project for Noë & Associates and developer Sumaida + Khurana.
Despite both shots being dusk and fairly similar, I used slightly different skies in each. The facade shot used 1941 and the Empire State Building shot used 1957.
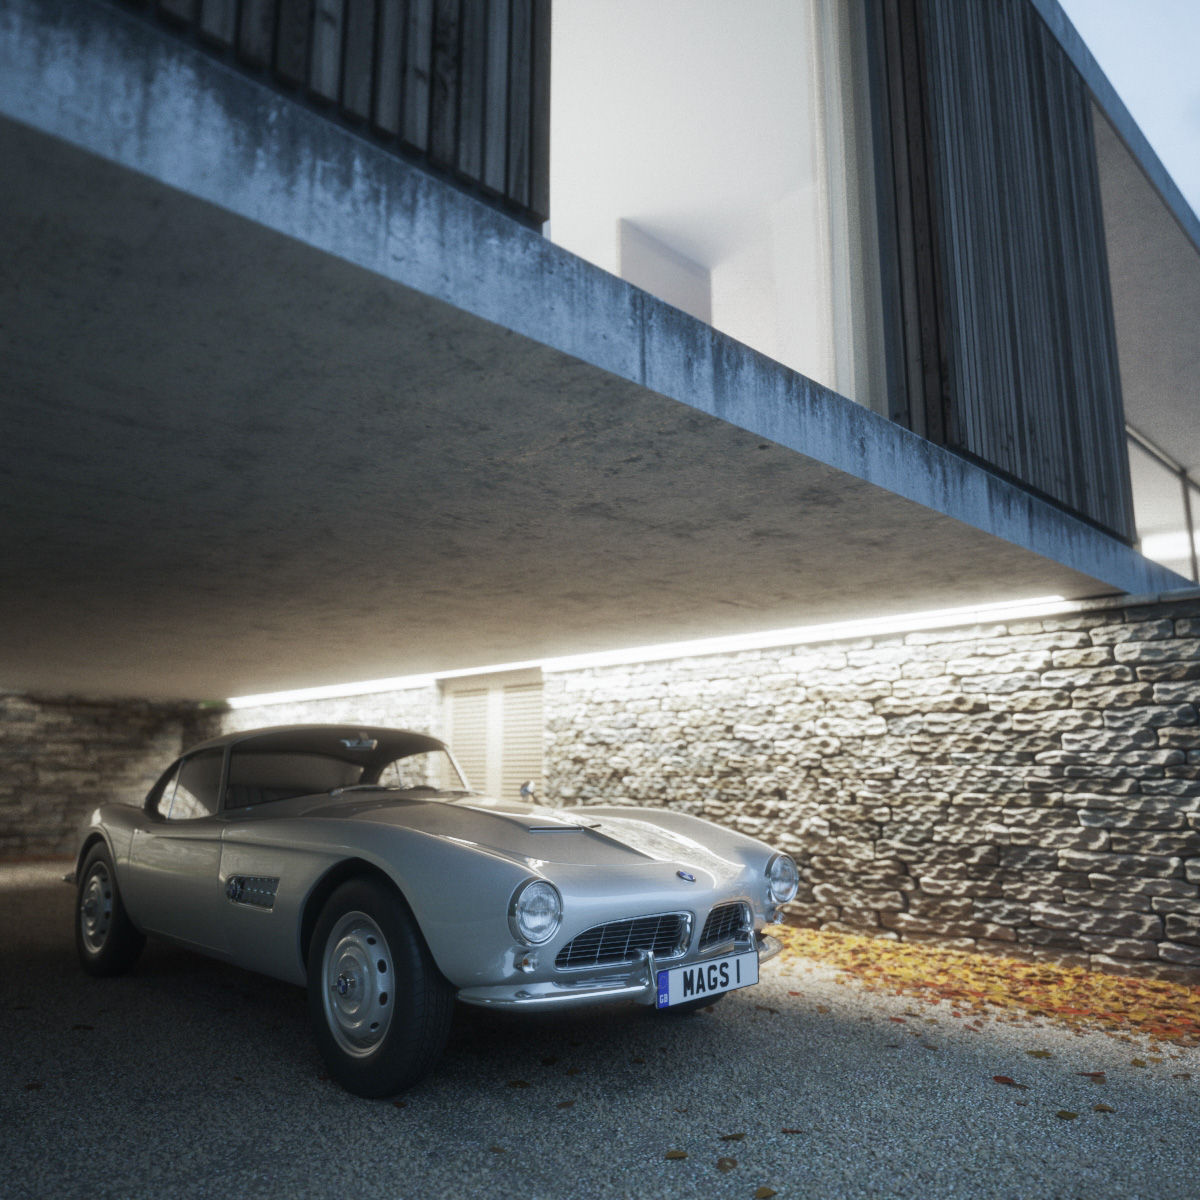
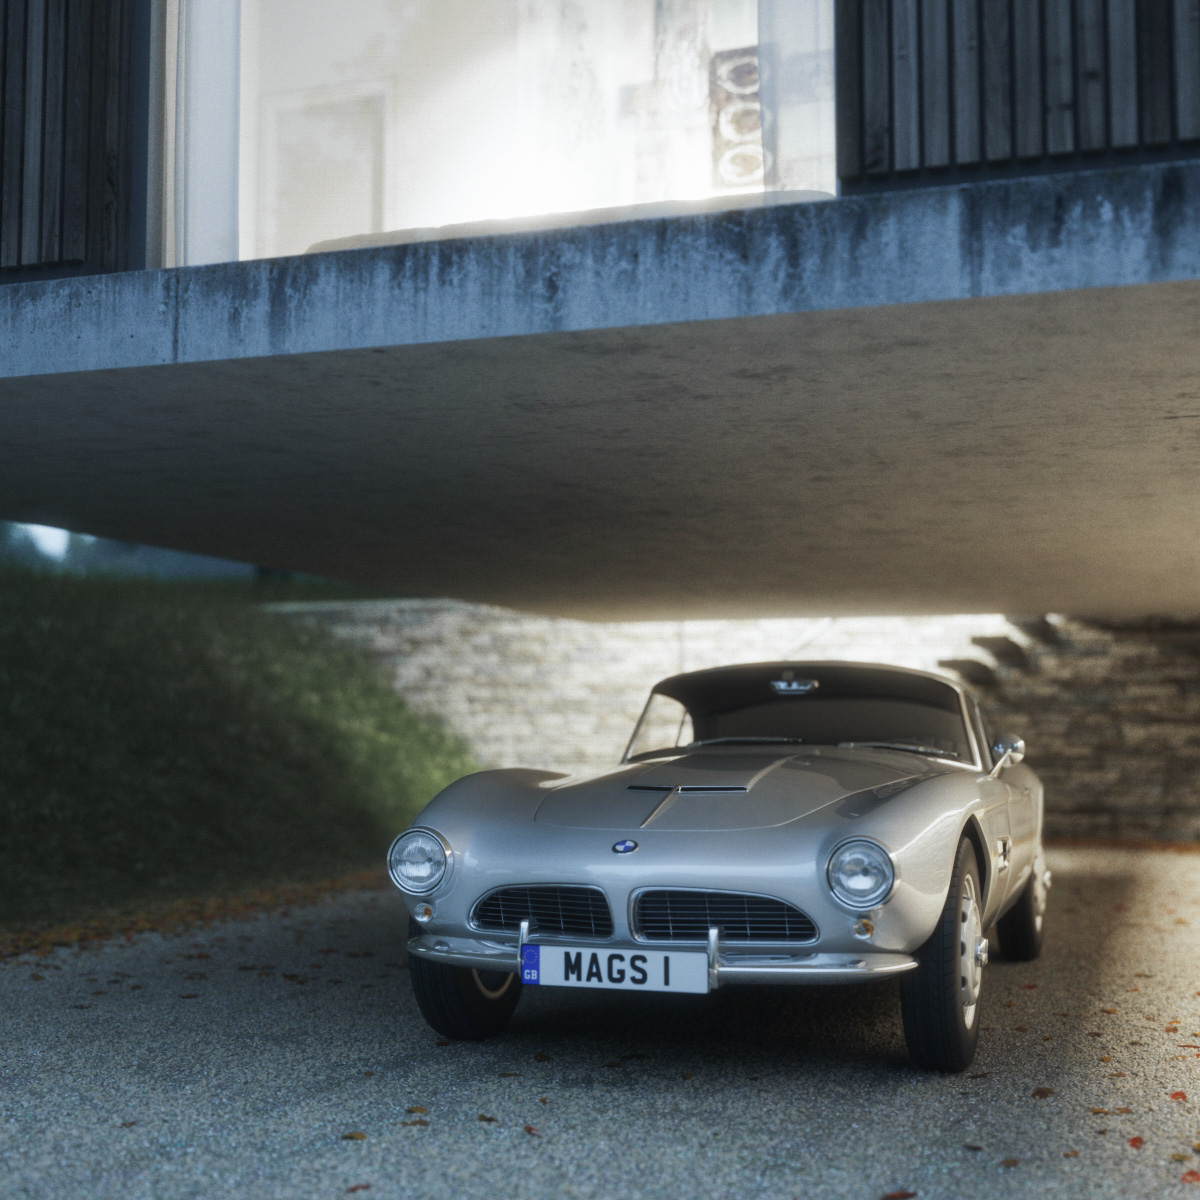
Detail shots of a 3d model bought from 3docean of the very handsome BMW 507 coupe. Set against the Quest house by Ström Architects of course.
I *think* I have managed to finally incorporate a search function in this blog, AT LONG LAST! The squarespace search function is a bit weird in that it brings up a lightbox/overlay type thing, but otherwise it seems to work pretty well (it works on my iphone too but is a bit fiddly).
So to find that tutorial on using vrayedgestex to break up a rough concrete edges, just type vrayedgestex and you should find it!
OH, and you'll find it lower down the sidebar to the right >
A good example of where the new 'Max Ray Intensity' feature in Vray 3 can come in handy. In the render below you can see the dreaded 'fireflies' or 'speckles' that often plague vray users, especially if using a hdri sky (you might need to click the image bigger to see them).
render 'A' - settings as they were for vray 2. render time: 7 mins 31 s
fireflies!
Simply turning on max ray intensity (MRI from here on) removes these fireflies from the main render (reflection element included above as it is in the reflections that the fireflies occur). You can also see that vray isnt havent to work as hard from the sample rate element and so it is noticeably quicker into the bargain.
The only time I have found that having MRI on can slow down a render, is when doing particularly hard to light interiors where there is very little light bouncing around. In those cases vray seems to perform better with it turned off, but otherwise I would recommend you generally leave it on by default.
render 'B' - turned Max Ray Intensity on. render time: 6 mins 49 s
Below is the same scene but with embree turned on. A small percentage gain, but again, I mostly leave embree on by default these days.
render 'C' - turned Embree on. render time: 6 mins 29 s


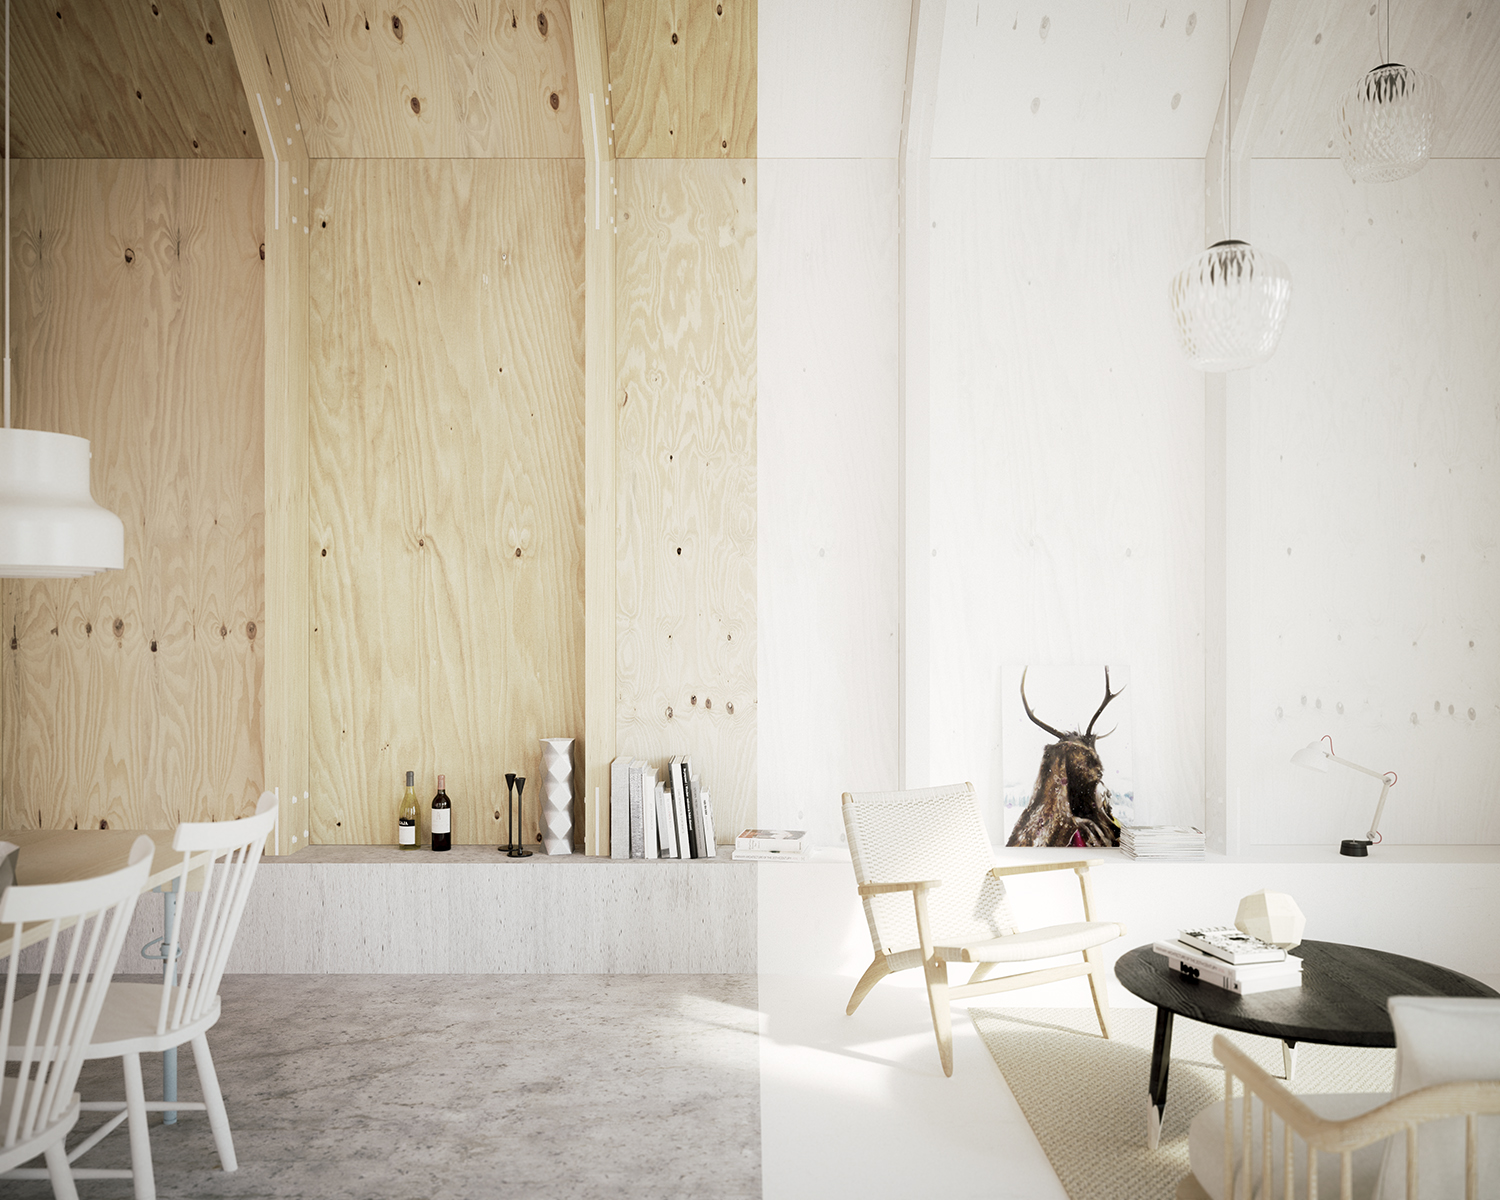
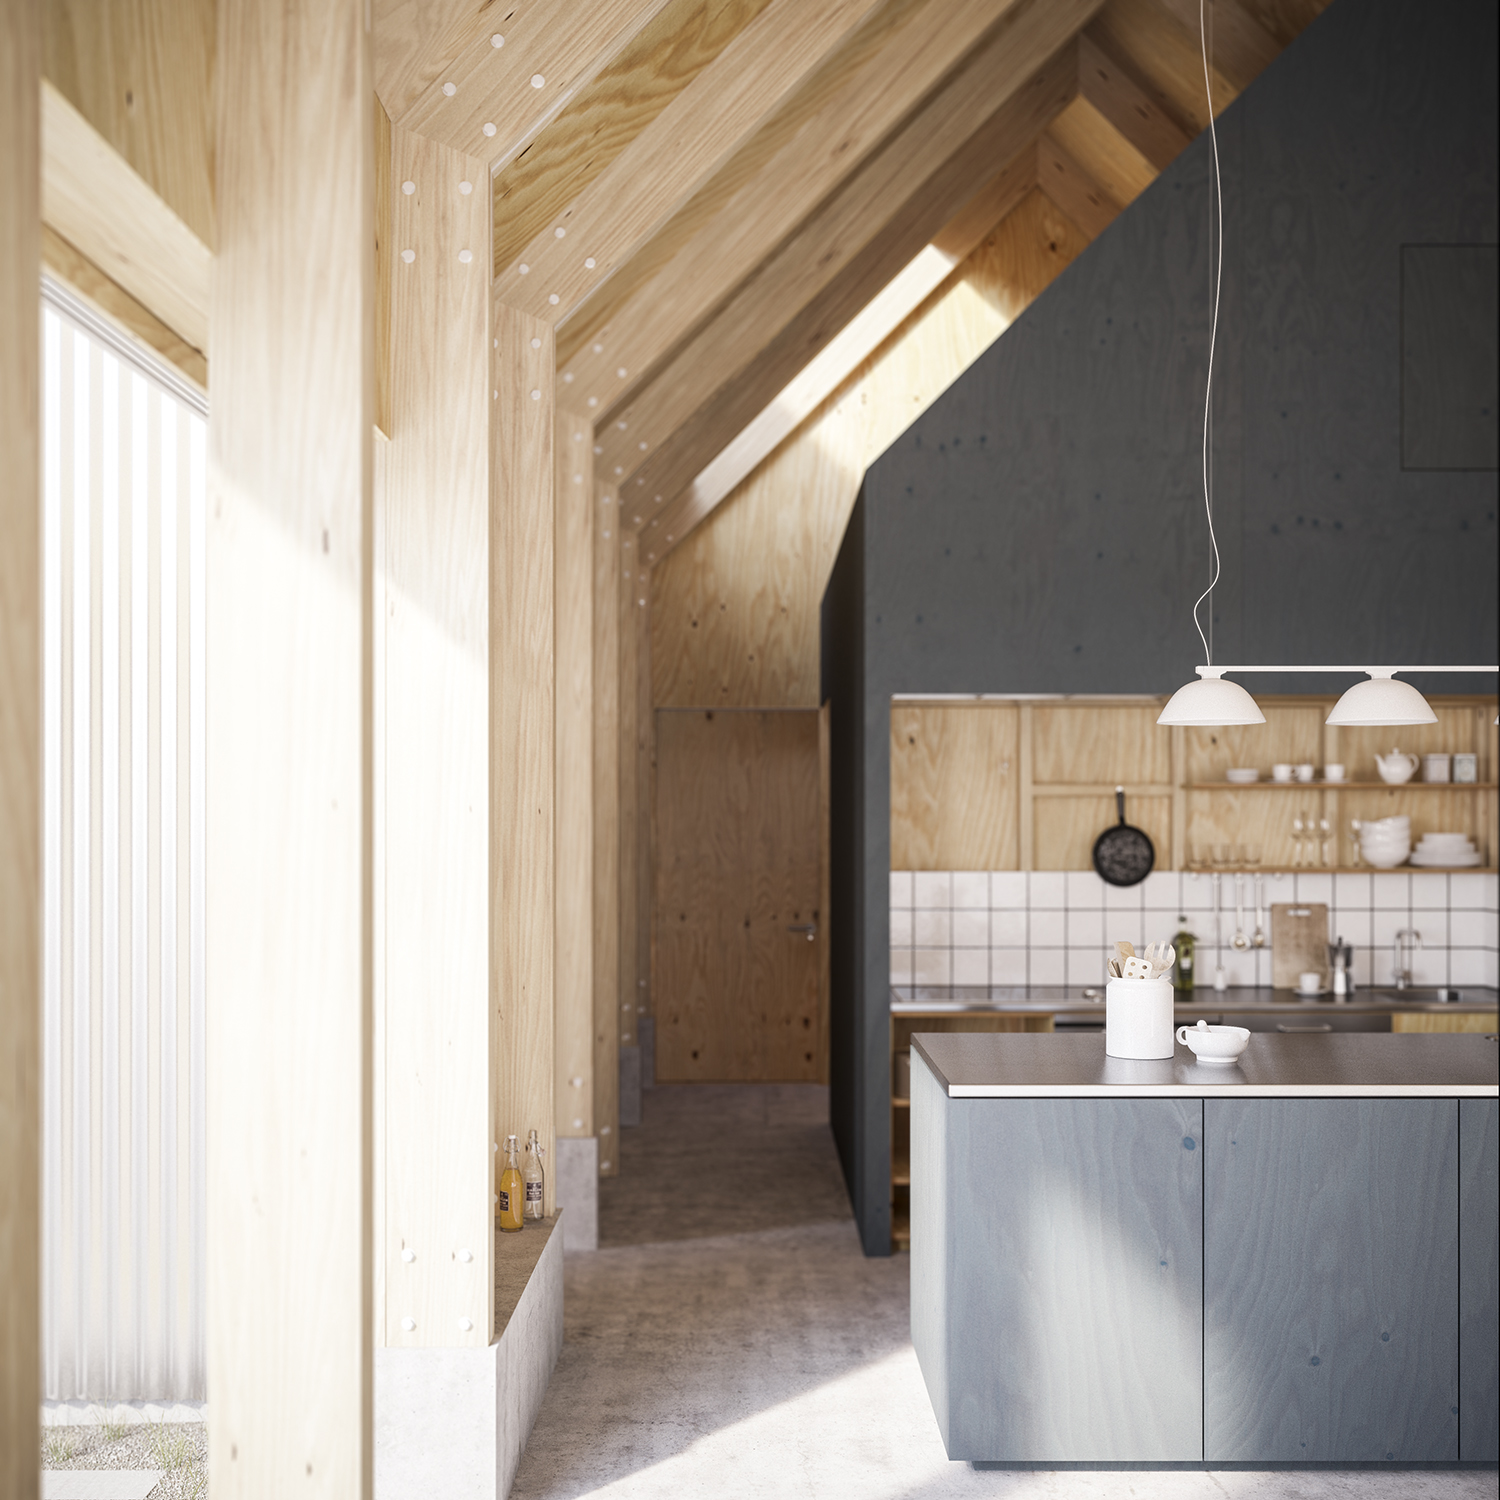
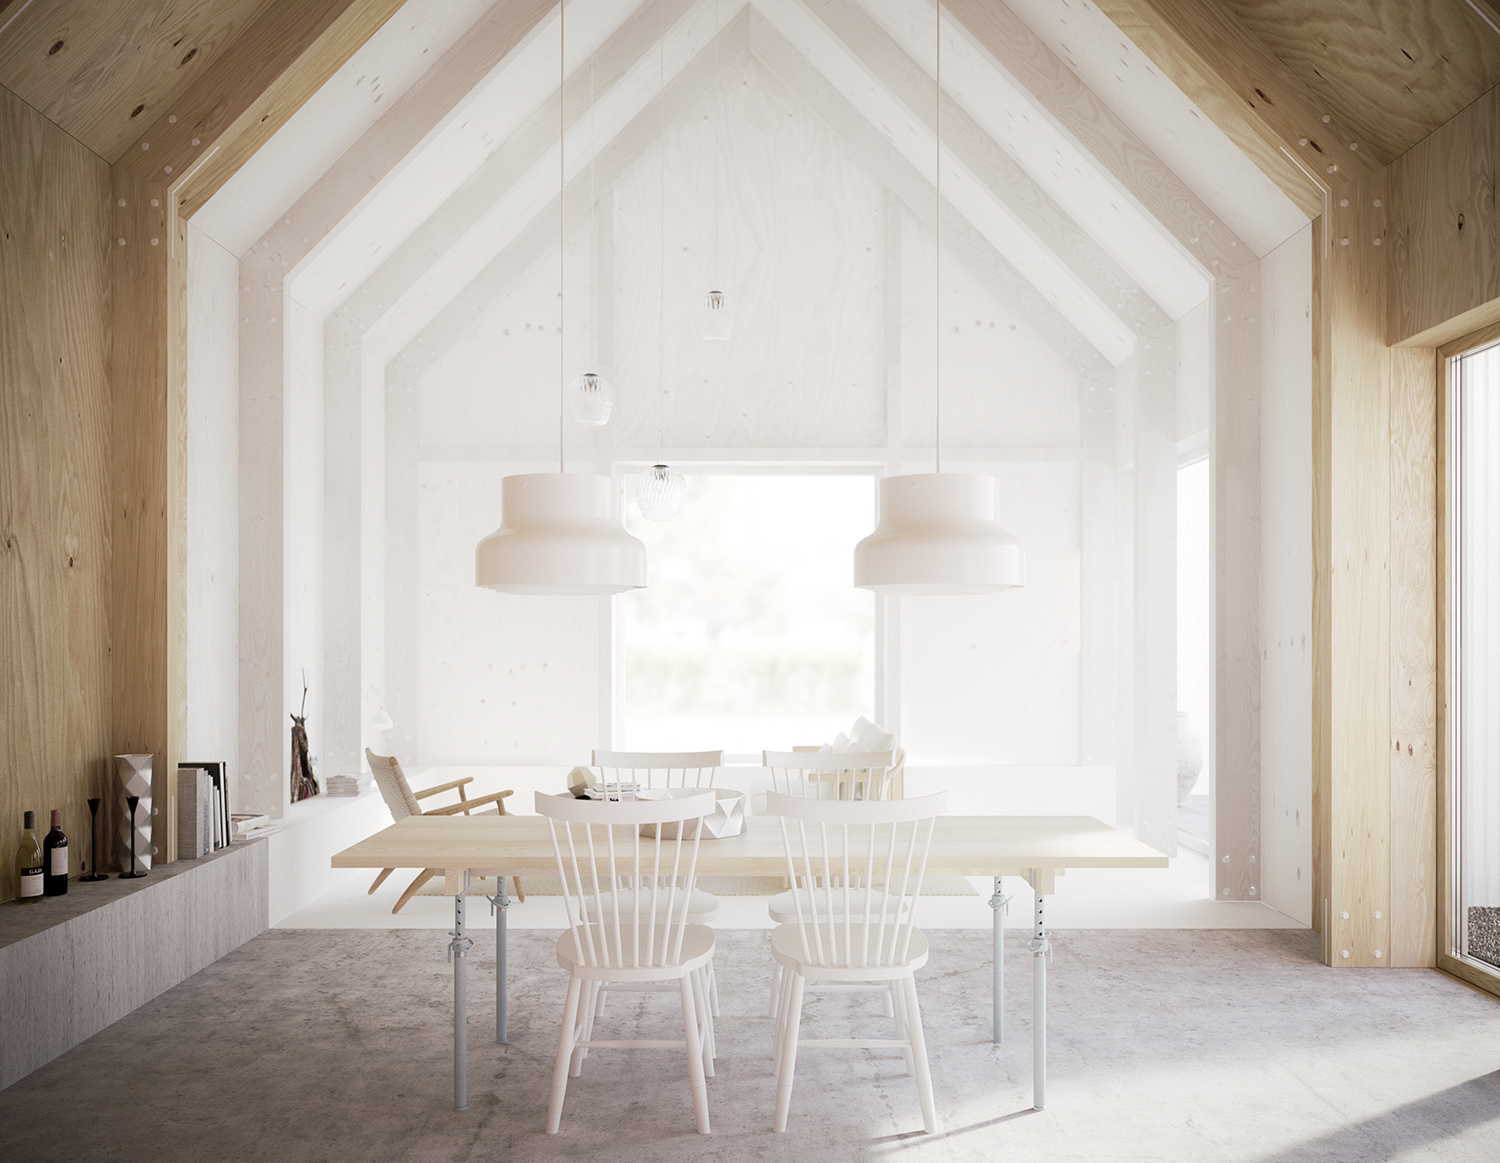
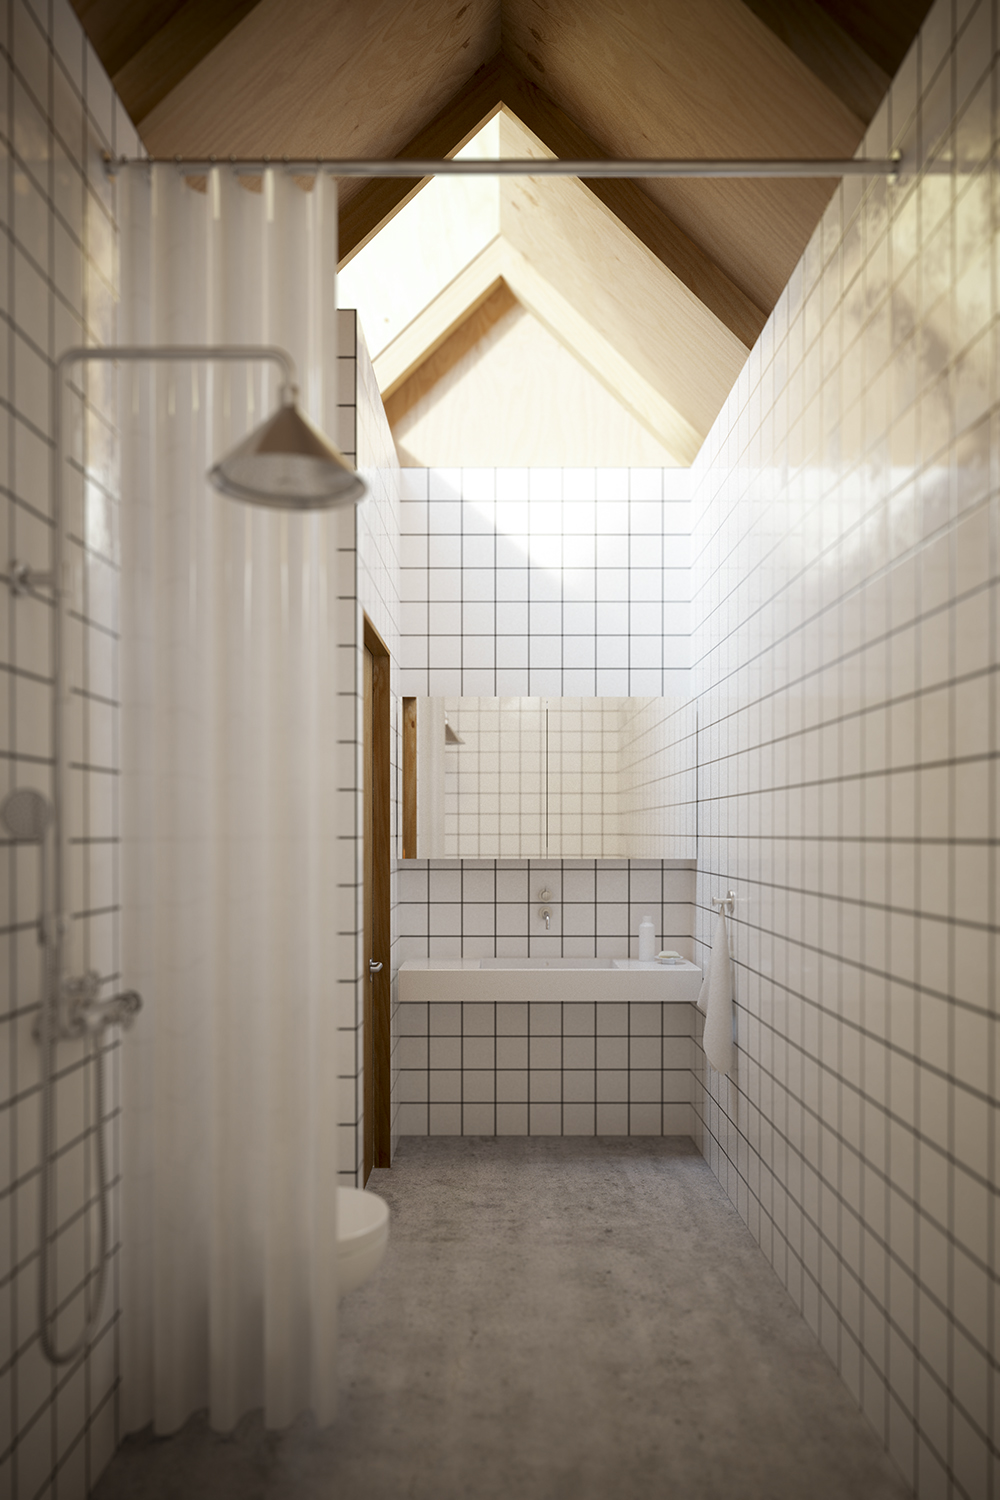
Björn Förstberg of Förstberg Arkitektur sent me some really nice renderings today of a project entitled 'House for mother'. They feature my plywood textures as well as being lit by HDR sky number 1103.
I have a mini tutorial on flickr somewhere on preparing photographed textures for use in 3d applications but can never find it so thought I would write it up properly for the blog.
These days I mostly take photos of individual textures rather than a whole wall or floor as there are so many great plugins like mightytiles, VP walls & tiles and multitexture that can take care of the randomisation for you. It makes the initial process of capturing the textures a lot easier for sure.
photos taken in a bit of a hurry as I had raised the suspicion of several security guards...
First thing I do is to run the photos through lightroom and make sure the color balance is the same on all raw files. Then I use the automatic straighten to try to square up the photo or the manual perspective tools if that fails. I then crop in lightroom and sometimes use the spotting tool to get rid of unwanted imprefections. Note that the colours are still a bit wild due to the uneven lighting, that can be fixed later.
In fact the camera's auto white balance probably did a decent job in retrospect, but if you are in a more controlled environment its usually a good idea to set the white balance manually in LR.
photo as shot
perspective quickly and roughly fixed to maximise the texture area
In photoshop, i then open the TIF that I exported, duplicate the layer for comparison purposes, then do a high pass of about 100 (radius) on it.
Filter>Other>High Pass
IMMEDIATELY after doing this, go to Edit>Fade High Pass change the mode to Luminosity and leave the opacity at 100% and hit OK. This brings back some of the colour info from your texture.
If at this point you are making a seamless texture, then you would use the offset filter (Filter>Other>Offset) and offset the image half of the resolution to the right and downwards, then tidy up the seams using whatever means you prefer.
Usually I am trying to match reference images for materials so a useful trick to get the colour right is to use the match color tool
Image>Adjustments>Match Color
and then select the source reference image (open it first in photoshop) and adjust the sliders till you get a decent match. Even if not matching a specific reference image, this step is great to make sure all your textures are harmonious in colour.
That's about it! Usually when making a Mighty Tiles texture I'd try and have 8 or more fairly high res textures.
PS. I have tried every seamless texture maker plugin going and never really liked any of them. Same goes for bump & normal map making programs. I always get better results taking my own photos and then trying to come up with a clever way of making a displacement map for it, if needed.
Bit of a fresh take on old technology, but really quite effective I think. The resulting panorama is HTML5 so should be viewable on mobile devices too.
I asked for advice on the chaosgroup forum on what the best way of making panoramas is these days and the general consensus seemed to be that Pano2VR is the way to go. Apart from that, rendering a suitable image is very straightforward with vray:
the rendered equirectangular (?) image
Double clicking the panorama should launch it in fullscreen (IE and mobile users might have to make do with non fullscreen I'm afraid).
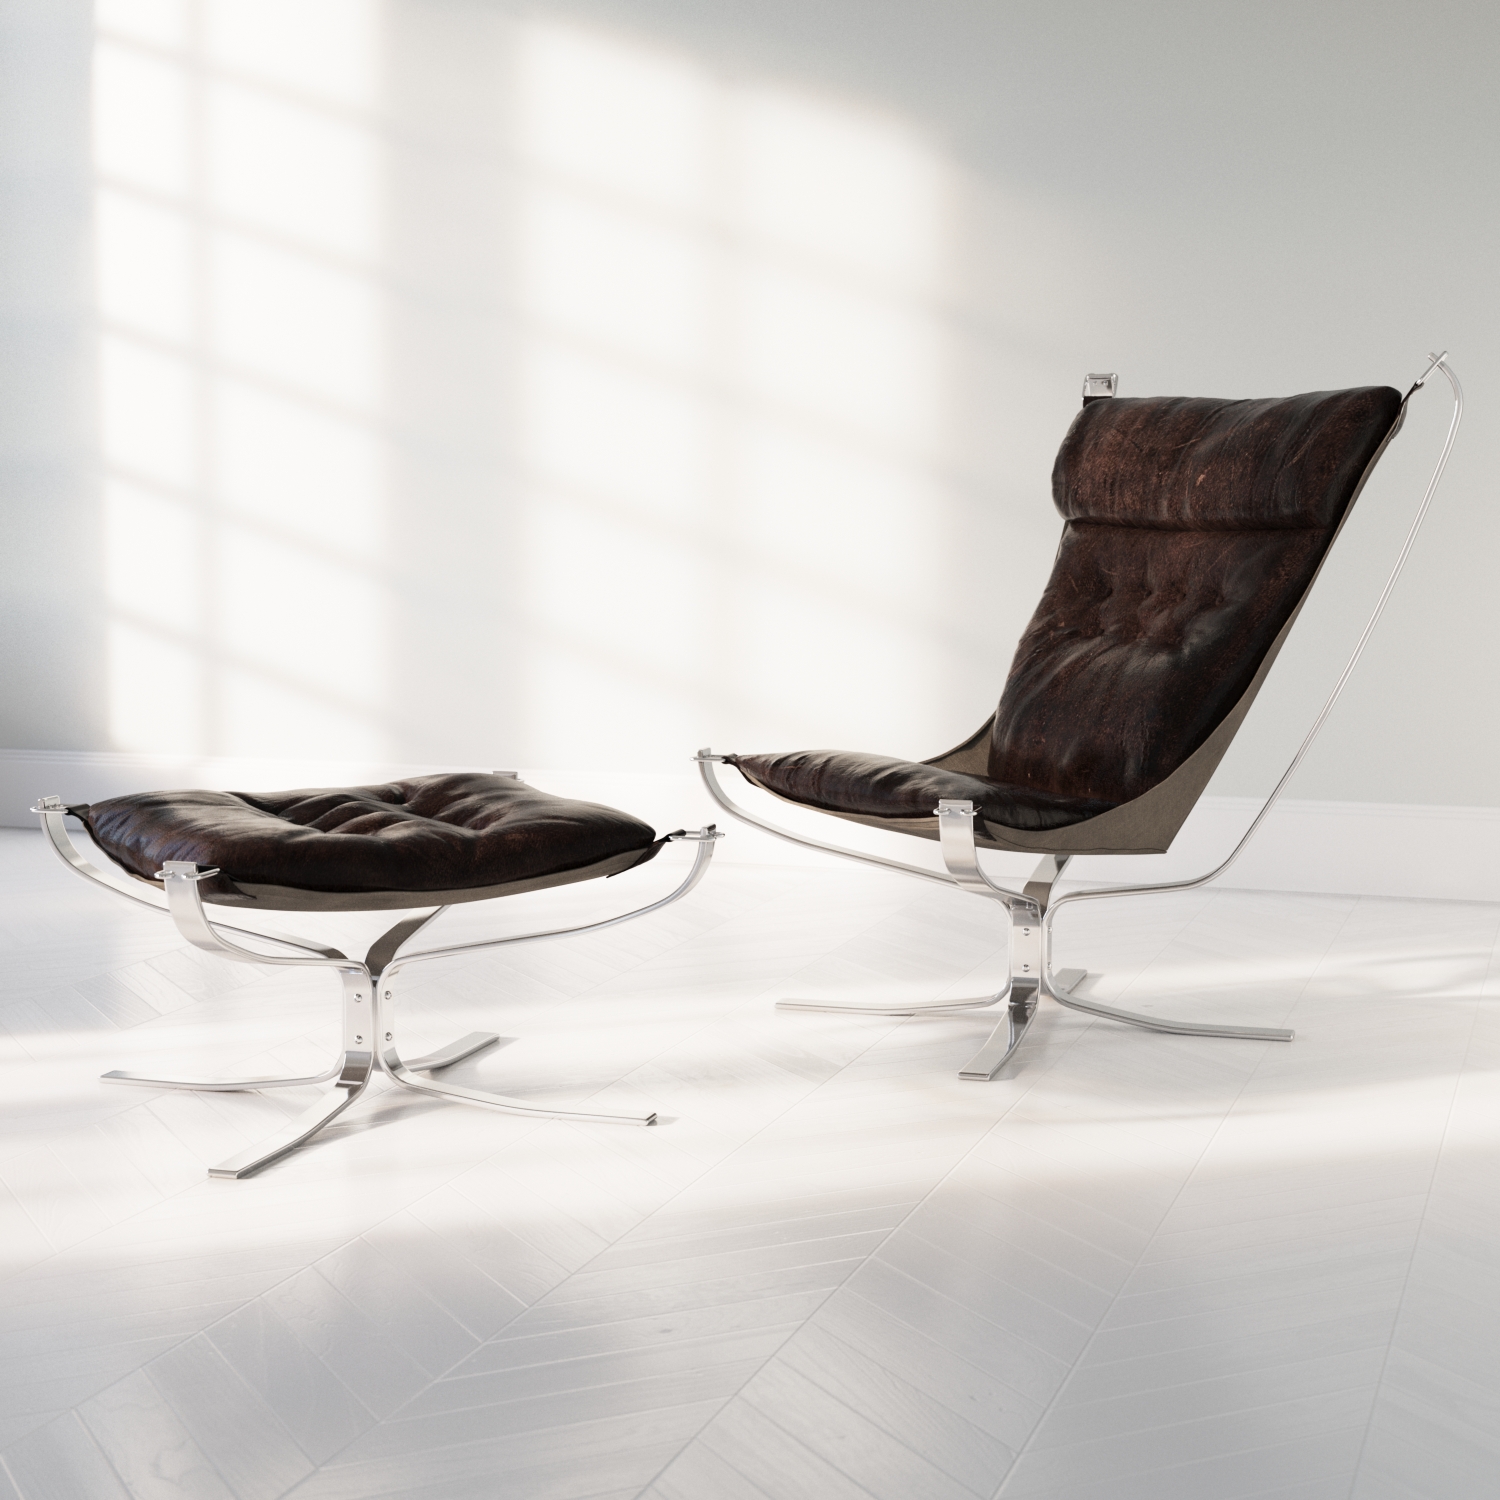
Some quick renders of a great chair that my grandparents had in their living room and that I was always a bit fascinated by. Its the Falcon chair by a Norwegian designer called Sigurd Ressell.
Rendered with Corona, lit by '1739 Sun Clouds' HDR and NOT modelled by me.. I wouldn't know where to start!
The walnut floor texture can be found here: Orangegraphics

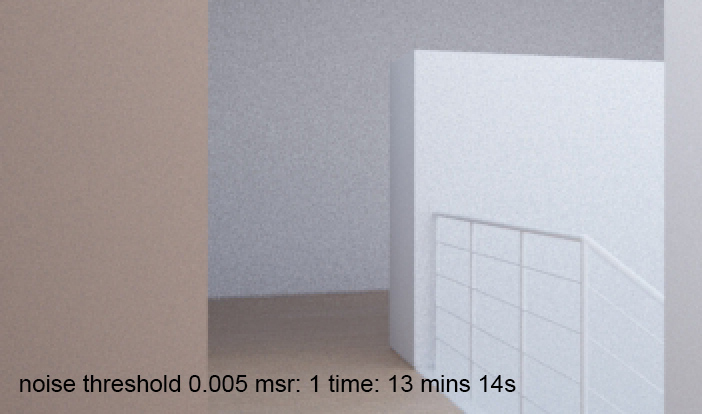
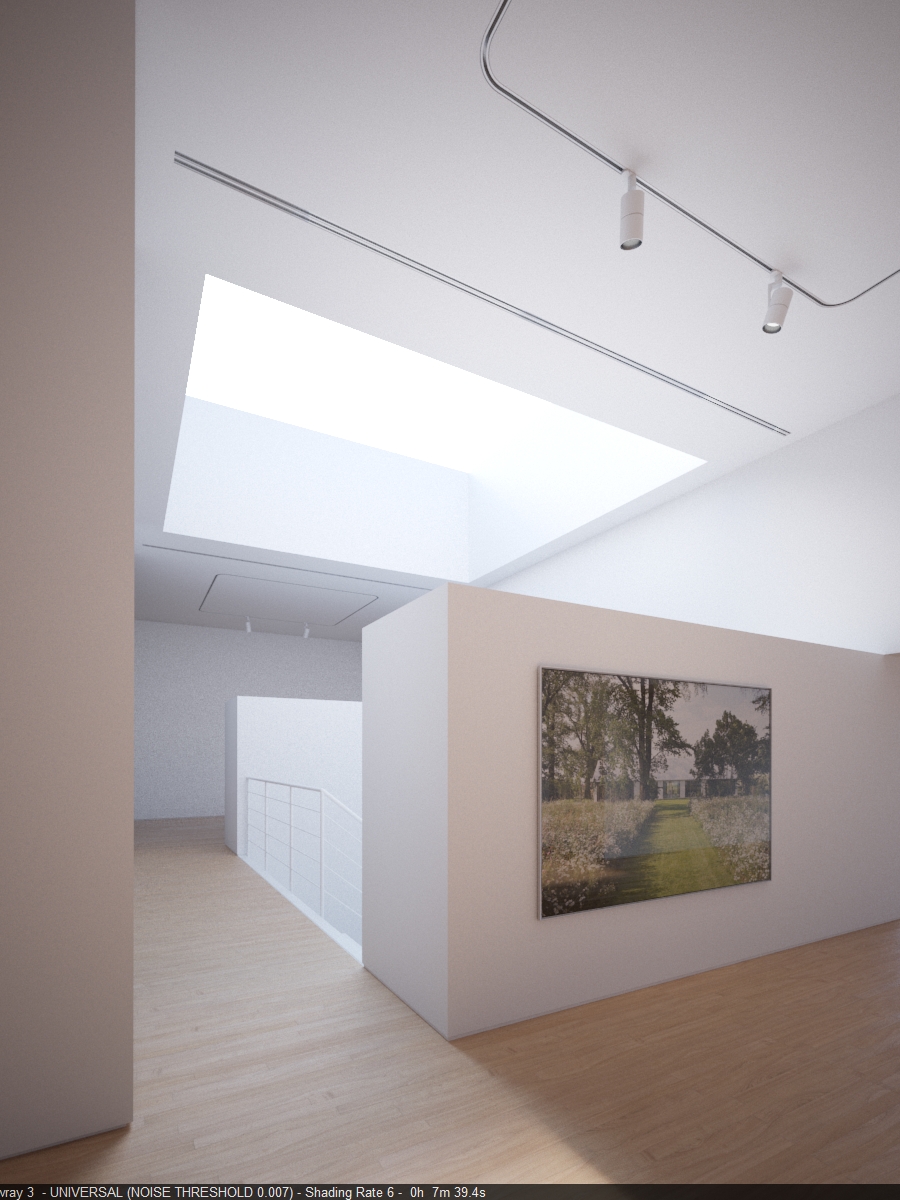
With Vray 3.0, a new parameter has appeared under 'image sampler' called min shading rate. Inspired by some interesting discussion on the forum, I thought I'd find out what it does.
From help.chaosgroup.com :
"Min shading rate - this option allows you to control the number of rays shot for AA versus rays for other effects like glossy reflections, GI, area shadows etc. It is especially useful with the Progressive image sampler. Higher values mean that less time will be spent on AA, and more effort will be put in the sampling of shading effects.
When loading scenes saved with V-Ray 2.x, the Min shading rate parameter is set to 1 in order to produce the same results as the previous V-Ray versions."
So.. as far as I understand it, it allows you to re-balance the work vray is doing away from AA (geometric detail, textures) and back to, ummmm all the other stuff (GI, lighting, reflections etc). That's as far as I get without my brain starting to hurt, so lets try it out in practice.
(click for bigger) (for those interested, a shading rate of 20 took 15mins 46s)
The settings are all as per the vray universal settings and a noise threshold of 0.005, all I am doing is increasing the min shading rate from its default of 1.
As you can see, higher values don't necessarily mean longer render times in the world of adaptive sampling, presumably because the AA has less work to do as the GI, lighting, reflections and whatever else are cleaner. Don't ask me to explain this any further, I can't!
What is interesting to me though, is that at the shading rate of 6, not only is it faster, it is also less noisy. (marginal I know!)
With that in mind, and with the object for me being to reduce the render time, I increased the noise threshold slightly to 0.007.
So in summary, a reduction of render time from 13 mins 14s down to 7 mins 39s, and looks pretty much identical. I'd guess that this approach will work best with interiors but let me know if you have any success with exteriors.
EDIT: same testing procedure on an exterior scene below, as expected, not as much of a difference as with the interior.